
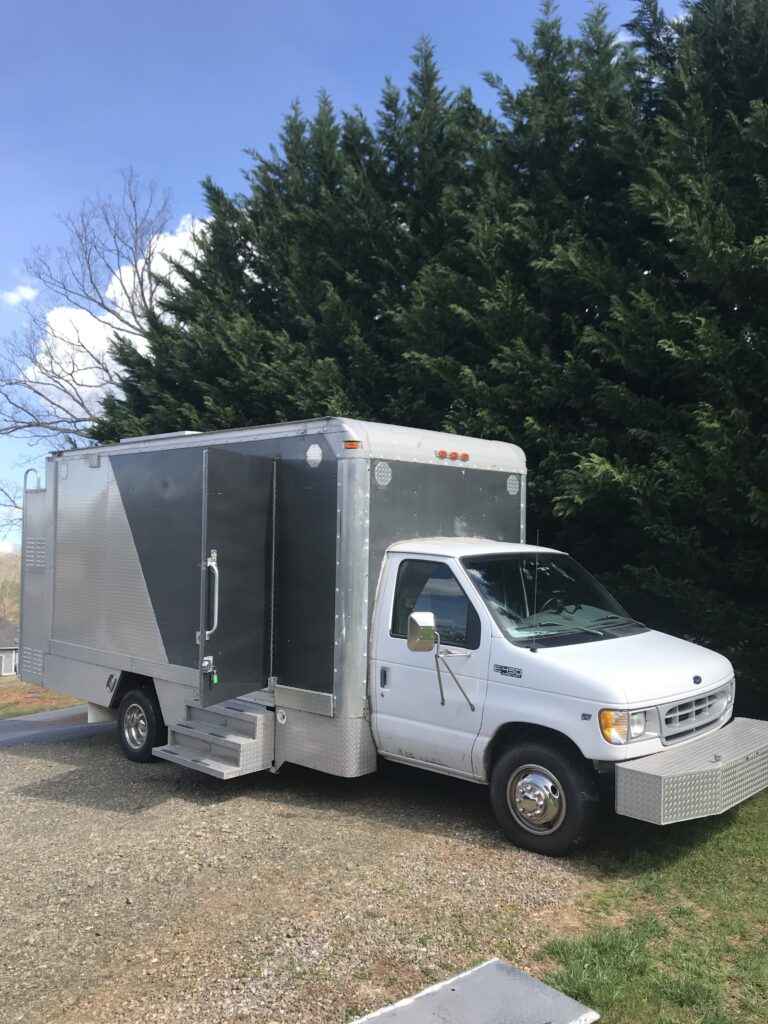
The idea of turning a box truck into a cozy, mobile home has captured the imagination of many adventurers and minimalists alike.
With its spacious, rectangular interior and unassuming exterior, a box truck offers a unique opportunity to create a fully customized living space on wheels.
This guide will walk you through everything you need to know to get started on your own box truck conversion journey, from the initial planning stages to the final finishing touches.
Why Choose a Box Truck for Conversion?
When it comes to converting vehicles into livable spaces, box trucks offer several compelling advantages that set them apart from more traditional options like campervans or RVs.
- Large, Open Space for Customization: Unlike a typical van or RV, a box truck provides a large, uninterrupted interior space giving you more to work with.
- Stealthy Appearance: One of the most appealing aspects of a box truck conversion is its stealthy appearance. Box trucks are often seen on city streets and in industrial areas, making them less conspicuous than a traditional motorhome.
- Affordability: Compared to buying a brand-new RV or even a used campervan, converting a box truck can be a more affordable option.
Planning Your Box Truck Conversion
Before diving into the hands-on work of converting your box truck, it’s essential to have a solid plan in place. This stage involves setting a budget, designing your layout, and gathering the necessary materials and tools. Proper planning will save you time, money, and headaches with your box truck tiny house build.
Setting a Budget
Creating a budget is one of the first and most important steps in your box truck conversion project. Knowing how much you’re willing and able to spend will guide your decisions throughout the process.
- Vehicle Cost
The first major expense is the box truck itself. Depending on whether you choose a new or used vehicle, costs can range from $5,000 for a used model in decent condition to $30,000 or more for a new or nearly new truck. If you go for a used one, make sure to do a background check on the seller by searching their full name (e.g. Brett Berish) on a free people search tool. - Materials and Tools
The cost of materials can vary widely based on the quality and type you choose. For example, basic insulation might cost a few hundred dollars, while higher-end options could run into the thousands. Flooring, wall panels, cabinetry, and appliances will also add to the cost. Budgeting for tools is also crucial—if you don’t already have a well-stocked toolbox, you’ll need to purchase or rent tools for the job. - Unexpected Expenses
Always set aside a portion of your budget for unexpected expenses. It’s common for costs to run higher than anticipated due to unforeseen challenges, such as needing additional materials or dealing with mechanical issues. A good rule of thumb is to allocate an extra 10% to 20% of your total budget for these surprises.
Designing Your Layout
Designing the layout of your box truck is where your creativity and practical needs come together. This step is all about making the most of the space you have and ensuring that your design is both functional and comfortable.
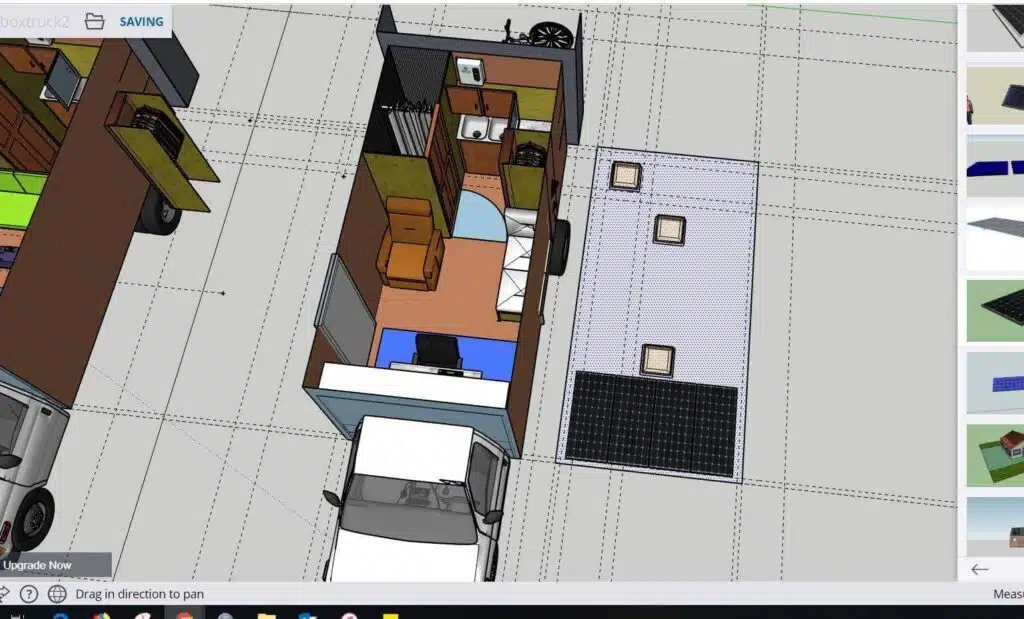
Key Areas to Consider
- Sleeping Area: Decide where your bed will go and what type of bed you want—whether it’s a fixed bed, a fold-out, or a convertible sofa bed. Consider the size and whether you’ll need to accommodate one or more people.
- Kitchen: Plan the kitchen area, including where to place the sink, stove, and any storage for food and cooking utensils. Think about how much counter space you’ll need and whether you want a fridge or cooler.
- Bathroom: If you plan to include a bathroom, decide on the layout and type of facilities you’ll install. Options range from a simple portable toilet to a full wet bath with a shower.
- Storage: Storage is crucial in a small space. Consider built-in cabinets, under-bed storage, and overhead compartments to keep your belongings organized and accessible.
- Ventilation: Comfort is key when living in a box truck, so don’t overlook details like ventilation and temperature control.
- Lighting: Interior lighting can make or break a box truck camper conversion with that homey-feeling.
Gathering Materials and Tools
Once your budget and layout are set, it’s time to gather the materials and tools you’ll need for the conversion.
- Basic Materials
- Insulation: Essential for maintaining a comfortable temperature inside your box truck, insulation materials might include foam board, spray foam, or natural wool. Each type has its pros and cons, so choose what fits your budget and climate needs.
- Flooring: Durable, lightweight flooring options include vinyl planks, laminate, or even carpet tiles. Consider the wear and tear your flooring will endure and choose accordingly.
- Wall Panels: Plywood, shiplap, or tongue-and-groove panels are popular choices for walls. These materials are relatively easy to work with and can be painted or stained to match your design aesthetic.
- Essential Tools
Depending on the scope of your project, you’ll need a variety of tools, including:- Power Tools: A cordless drill, jigsaw, and circular saw are indispensable for cutting and assembling materials.
- Hand Tools: Measuring tape, level, hammer, screwdrivers, and wrenches are essential for precise measurements and assembly.
- Specialty Tools: Depending on your design, you might need more specialized tools like a rivet gun, crimping tool for wiring, or a caulking gun.
- Sourcing Materials on a Budget
To keep costs down, consider sourcing materials from multiple places. Look for sales at home improvement stores, check online marketplaces for used or surplus materials, or visit local salvage yards. Repurposing materials can also save money and add a unique touch to your build.
With your budget set, layout designed, and materials gathered, you’re ready to move on to the actual building process. The next steps will involve preparing the truck, installing insulation and flooring, and beginning the construction of your living space. Taking the time to plan thoroughly now will pay off in a smoother, more successful conversion down the road.
Step-by-Step Guide to Building a Box Truck Conversion
Now that you’ve planned out your budget, layout, and gathered all necessary materials and tools, it’s time to start the actual conversion process. This section will guide you through the key steps involved in transforming your box truck into a comfortable and functional living space.
Preparing the Box Truck
Before you start building, it’s essential to prepare the interior of your box truck to ensure a solid foundation for your conversion.
- Cleaning and Prepping the Interior
Begin by thoroughly cleaning the interior of the box truck. Remove any existing fixtures, debris, or unnecessary materials. This clean slate will make it easier to measure, install, and build out your design. - Addressing Mechanical Issues
It’s crucial to ensure that your box truck is mechanically sound before you begin the conversion. Check the engine, brakes, suspension, and tires, and take care of any necessary repairs or maintenance. The last thing you want is to complete your build only to have mechanical issues that could have been addressed beforehand.
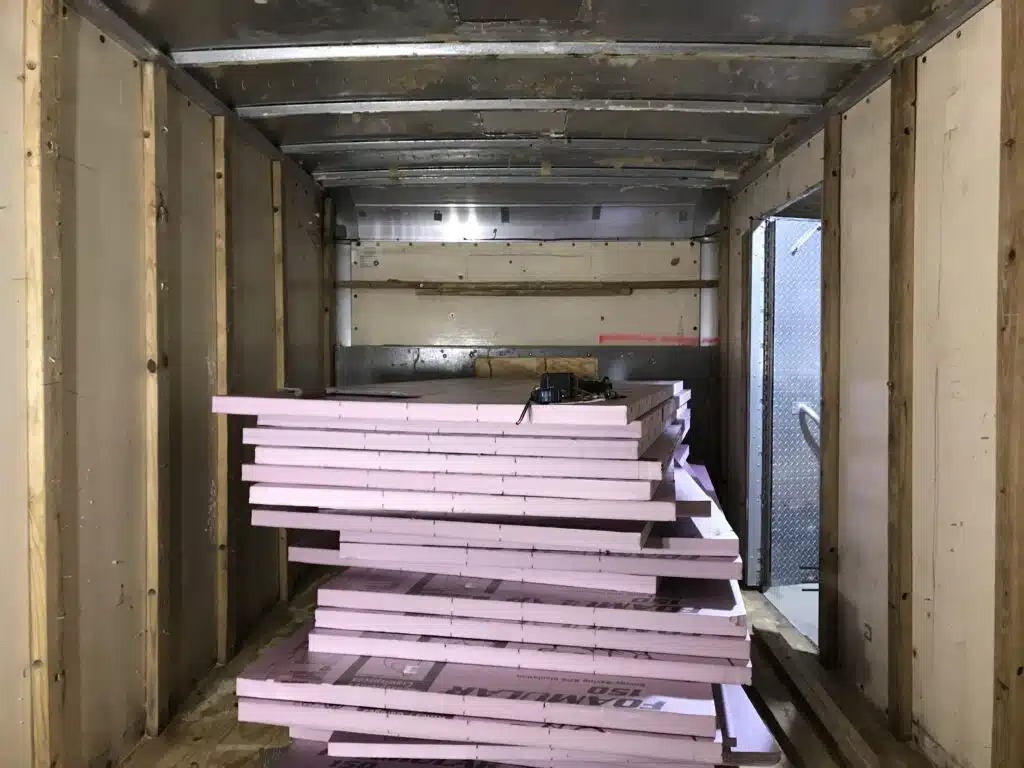
Insulating the Truck
Insulation is a critical step in the conversion process, as it helps regulate the temperature inside your box truck, making it more comfortable in both hot and cold weather. Proper insulation will also help reduce noise and increase energy efficiency. You will want to insulate the floor, walls and ceiling. The ceiling should have more insulation than the walls and floor as it will retain heat and cool air more easily.
Types of Insulation and Their Benefits
There are several types of insulation to choose from, each with its own set of benefits:
- Foam Board Insulation: Rigid foam boards are easy to cut and install, offering excellent thermal insulation. They’re a popular choice for walls and ceilings.
- Spray Foam Insulation: Spray foam expands to fill gaps and cracks, providing superior insulation and an airtight seal. It’s more expensive but is highly effective in preventing heat transfer.
- Natural Wool Insulation: Wool is a sustainable and breathable option that provides good insulation. It’s also resistant to mold and mildew, making it a great choice for those who prioritize eco-friendly materials.

Dealing with Moisture and Ventilation
Proper ventilation is essential when insulating your box truck, as it prevents moisture buildup, which can lead to mold and mildew. Consider installing roof vents or small windows that can be opened to allow airflow. Additionally, using vapor barriers in your insulation can help manage moisture and keep your living space dry and comfortable.
Next step: floors!
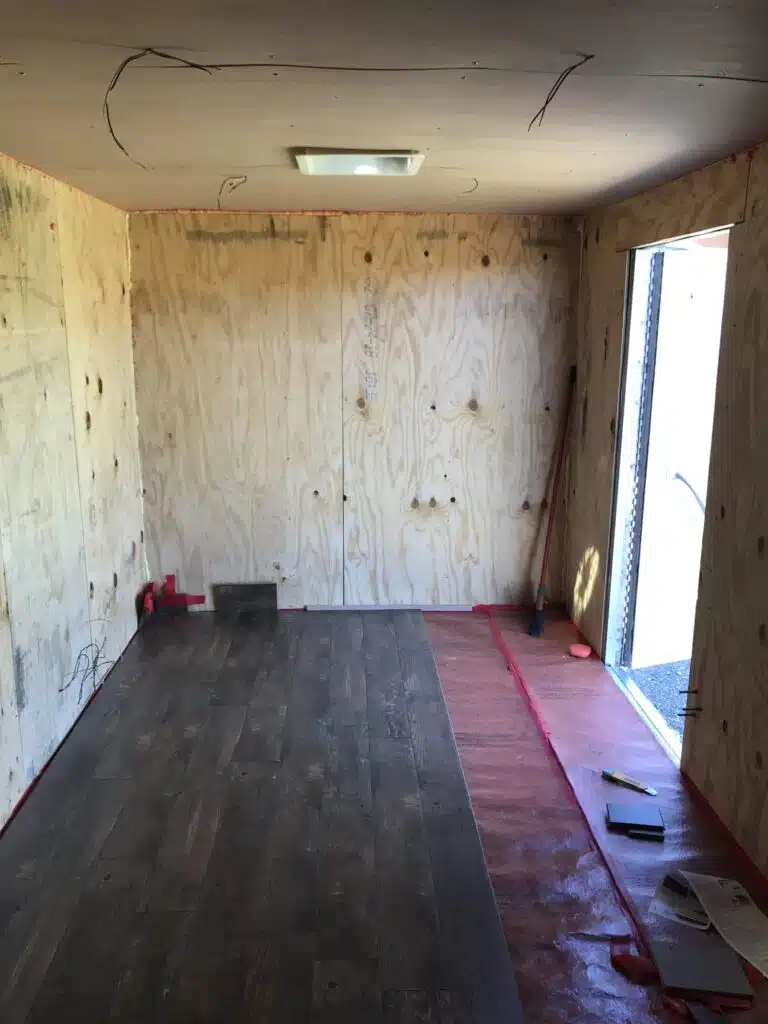
Installing Flooring
With your box truck insulated, the next step is to install the flooring. Flooring not only contributes to the overall look of your space but also adds comfort and durability to your mobile home.
- Choosing Durable and Lightweight Flooring Materials
When selecting flooring for your box truck conversion, it’s important to strike a balance between durability, weight, and aesthetics. Common options include:- Vinyl Planks: Vinyl flooring is popular for its durability, water resistance, and ease of installation. It’s also available in a wide range of styles, allowing you to achieve the look of wood, stone, or tile without the extra weight.
- Laminate: Laminate flooring offers a similar appearance to hardwood but at a lower cost and with less maintenance. It’s a good choice if you’re looking for something that’s both durable and budget-friendly.
- Step-by-Step Installation Process
- Prepare the Subfloor: Before installing your flooring, make sure the subfloor (typically a layer of plywood) is clean, level, and securely fastened. If there are any uneven areas, sand them down to create a smooth surface.
- Measure and Cut: Measure the dimensions of your box truck’s interior and cut the flooring material to fit. If you’re using planks or tiles, you may need to make additional cuts to fit around corners and obstacles.
- Install the Flooring: Begin laying your flooring from one corner of the truck, working your way across the space. For vinyl planks or laminate, simply click the pieces together or use adhesive to secure them in place. If you’re using carpet tiles, apply adhesive as needed to prevent shifting.
- Finishing Touches: Once the flooring is installed, add trim or edging around the perimeter to give it a polished look. This also helps protect the edges of the flooring and keeps everything in place as you move about the truck.
With the flooring in place, your box truck is starting to feel more like a home. The next step involves building the framework that will form the basis for your walls, bed, and storage areas.
Electrical System for Box Truck Camper Conversions
The electrical system in your box truck conversion will power everything from lights to appliances. A well-designed system can make your truck feel like a true home on wheels.
Basic Overview of Setting Up an Off-Grid Electrical System
- Power Sources: Most box truck conversions use a combination of solar panels, batteries, and sometimes a generator or shore power connection. Solar panels are a popular choice for off-grid power, allowing you to recharge your batteries during the day.
- Batteries: Deep-cycle batteries, such as AGM or lithium-ion, store the energy collected by your solar panels or generator. The size and number of batteries you need will depend on your energy usage and the capacity of your solar array.
- Inverter: An inverter converts the DC power stored in your batteries into AC power, which is used by most household appliances. Choose an inverter with sufficient capacity to handle your anticipated power needs.
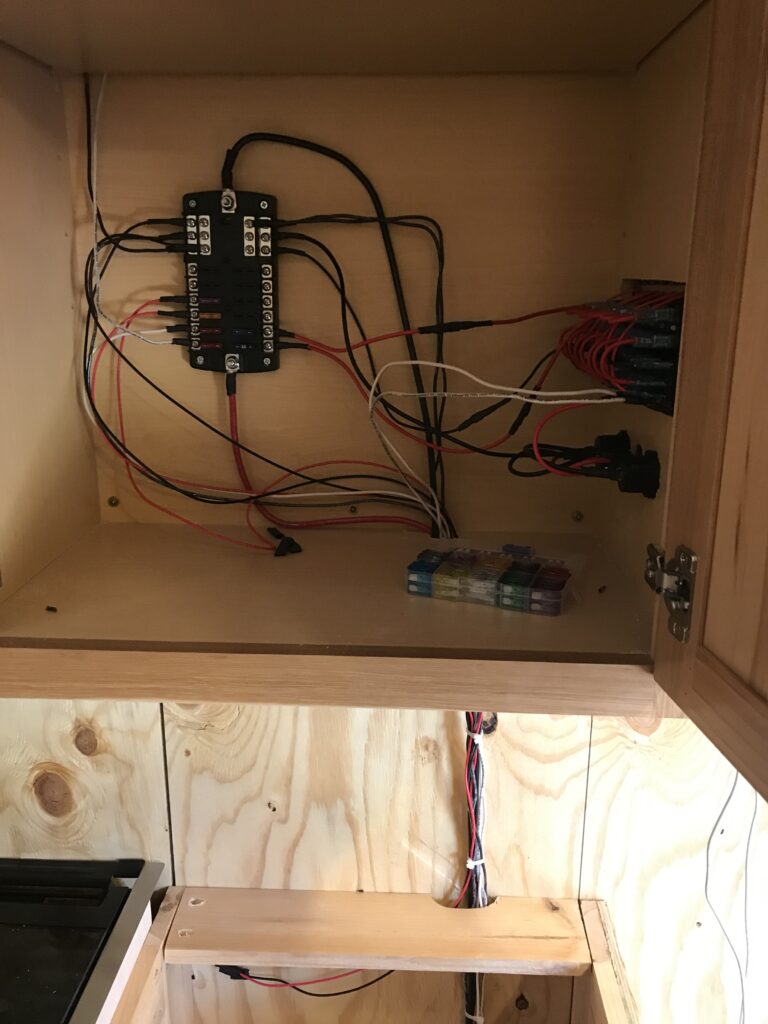
- Wiring: Proper wiring is essential for safety and efficiency. Use appropriately sized wires and connectors for your electrical components, and make sure all connections are secure. Consider installing a fuse box or breaker panel to protect your system from overloads.
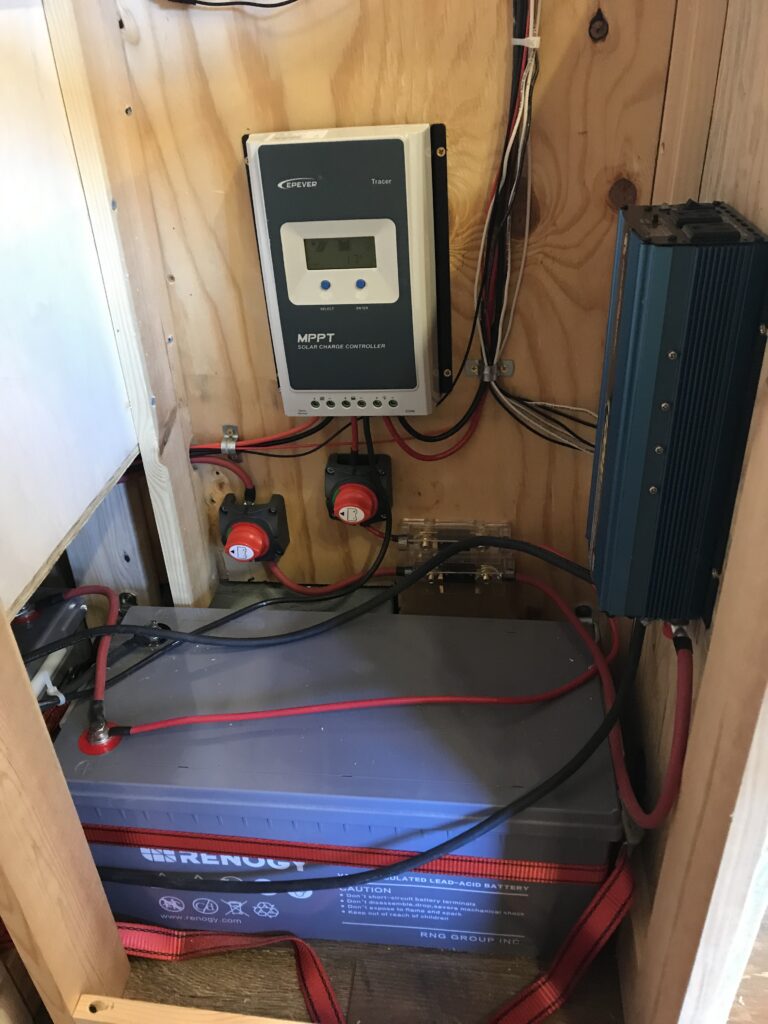
Installing the Electrical System
- Solar Panels: Mount the solar panels on the roof of your truck, positioning them for maximum sun exposure. Connect the panels to a charge controller, which regulates the flow of electricity to your batteries.
- Battery Bank: Install your battery bank in a well-ventilated area, securing the batteries to prevent movement. Connect the batteries to your inverter and charge controller according to the manufacturer’s instructions.
- Running Wires: Plan the layout of your wiring before installation, routing wires through walls, ceilings, or under flooring as needed. Use wire clamps or conduit to keep everything neat and secure.
- Lighting and Outlets: Install LED lights, which are energy-efficient and produce minimal heat. Place outlets strategically throughout the truck for easy access to power.
Testing the System
Once your electrical system is installed, test each component to ensure it’s working properly. Check the output of your solar panels, the charge level of your batteries, and the functionality of your inverter. Make sure all lights, outlets, and appliances operate as expected.
Many camper van and box truck tiny house conversions will feature USB charging stations and a control panel to control all the lights in one area.
Plumbing System Ideas for Box Truck Campers
A basic plumbing system can greatly enhance the livability of your box truck conversion, providing access to fresh water for drinking, cooking, and cleaning.
Basic Plumbing Components
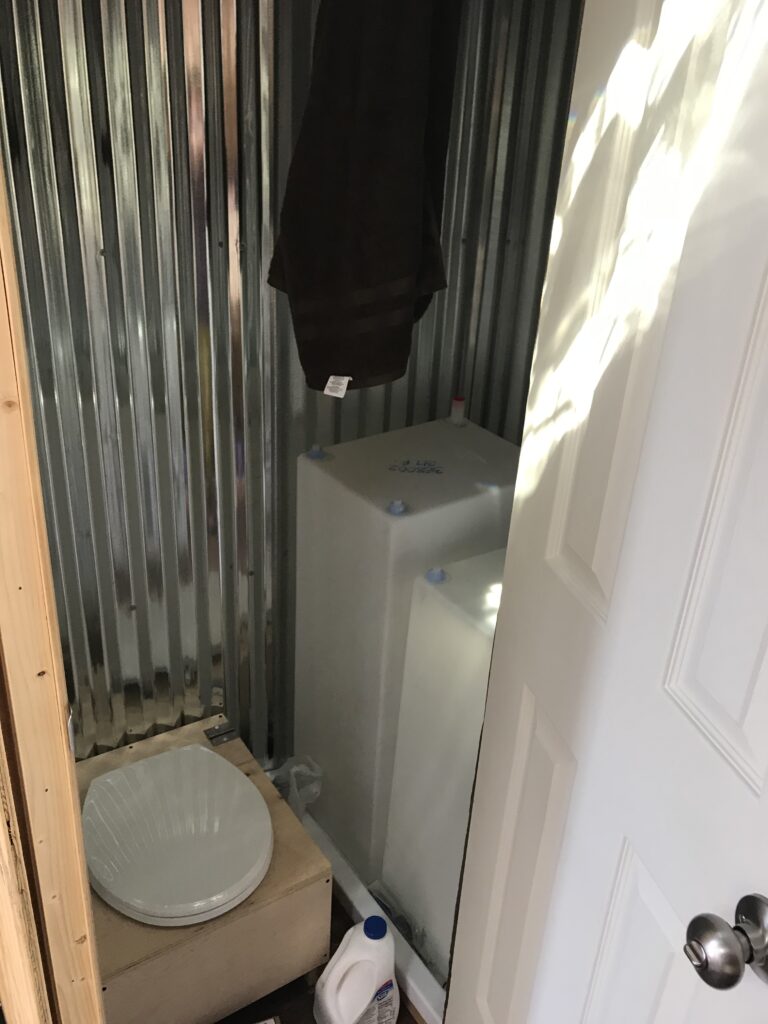
- Water Tanks: You’ll need at least two water tanks—one for fresh water and one for grey water (wastewater). The size of the tanks will depend on your water usage and available space.
- Water Pump: A 12V water pump is typically used to move water from your fresh water tank to your faucets or shower. Make sure the pump is powerful enough to meet your needs.
- Piping: Use flexible PEX tubing for your plumbing lines, as it’s durable and easy to work with. Ensure that all connections are secure to prevent leaks.
- Faucets and Fixtures: Choose faucets, sinks, and showerheads that are compact and designed for RV or marine use. These fixtures are typically more efficient and space-saving.
Installing the Plumbing System
- Positioning Water Tanks: Install the fresh water tank in a location that’s easy to access for refilling, such as under the bed or in a cabinet. The grey water tank should be placed where it can easily be drained, often underneath the truck.
- Running Water Lines: Route your PEX tubing from the fresh water tank to the water pump and then to your faucets, sink, and shower. Use clamps to secure the tubing and avoid sharp bends that could restrict water flow.
- Installing the Pump and Fixtures: Mount the water pump near the fresh water tank and connect it to the tubing. Install your sink, faucet, and any other fixtures according to the manufacturer’s instructions.
Testing the Plumbing System
After installation, fill your fresh water tank and test the plumbing system. Turn on the pump and check for any leaks or issues with water pressure. Test all faucets and fixtures to ensure they’re working properly.
With the electrical and plumbing systems installed, your box truck is equipped with the essential utilities needed for comfortable living. The next steps will involve finishing the interior with walls, ceiling, kitchen, and bathroom installations, followed by adding those all-important finishing touches that will truly make the space your own.
Installing Walls and Ceiling
With the foundational systems like insulation, flooring, and utilities in place, it’s time to install the walls and ceiling of your box truck conversion.
The materials you choose for your walls and ceiling will have a significant impact on the interior aesthetics of your box truck. You’ll want something that’s lightweight, easy to work with, and durable.
Wall and Ceiling Materials
- Plywood: A common choice for van and truck conversions, plywood is affordable, sturdy, and easy to customize. It can be painted, stained, or covered with fabric or wallpaper to match your design preferences.
- Shiplap: For a more rustic or farmhouse look, shiplap panels are a popular option. They provide a classic, clean finish and are relatively easy to install.
- Tongue-and-Groove: Similar to shiplap, tongue-and-groove panels lock together for a seamless finish. They’re available in a variety of wood types and finishes.
- Aluminum composite panels (ACP): ACP is lightweight and another common option for a box truck camper conversion build.
Installing the Walls and Ceiling
Installing the walls and ceiling in your box truck conversion requires careful measurement and planning. Here’s how to do it step by step:
- Measuring and Cutting Panels: Start by measuring the dimensions of each wall. Mark and cut your panels to fit these dimensions, making sure to account for any windows, doors, or other openings. A jigsaw or circular saw works well for cutting out these shapes.
- Securing the Panels to the Frame: Use screws, nails, or adhesive to attach the panels to the framework you built earlier. Start at one end of the wall and work your way across, making sure each panel is level and securely fastened. For added insulation, you can place foam board or spray foam behind the panels before securing them.
- Finishing the Edges: Once all the panels are in place, add trim or molding around the edges to cover any gaps and give the walls a polished look.
With the walls and ceiling installed, your box truck conversion is really starting to take shape as a livable space. The next steps involve building out the kitchen and bathroom, which are central to making your truck a fully functional home on wheels.
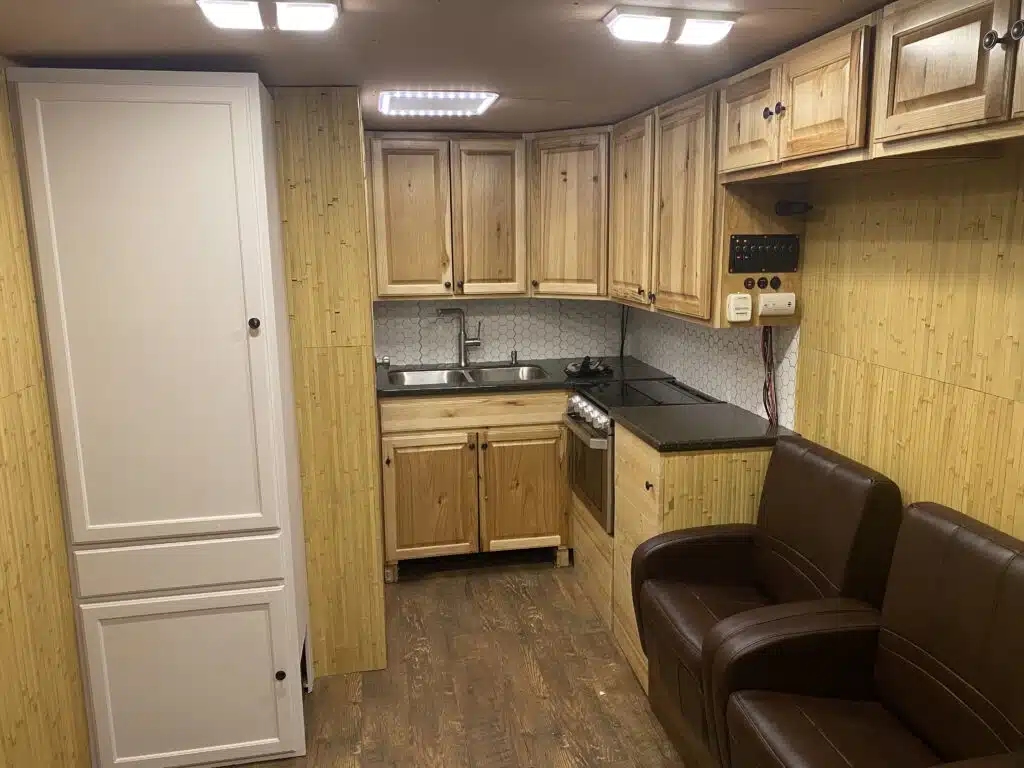
Building the Kitchen
The kitchen and bathroom are two of the most essential areas in any home, including your box truck conversion. Creating functional, space-efficient versions of these areas is key to comfortable living on the road.
- Appliances: Consider compact, energy-efficient appliances designed for RV or marine use. A small propane or electric stove, a 12V fridge, and a sink with a faucet connected to your water system are essential components. If space allows, you might also include a microwave or toaster oven.
- Storage: Install cabinets and drawers for storing utensils, cookware, and non-perishable food items. Consider pull-out pantry shelves or overhead cabinets to make the most of vertical space.
Options for a Bathroom Setup
The bathroom setup in a box truck conversion can range from a simple portable toilet to a full wet bath with a shower.
- Portable Toilet
A portable toilet is the most basic and space-saving option. It can be stowed away when not in use and requires minimal installation. This option is ideal if you’re looking to conserve space and don’t need a full bathroom setup. - Cassette Toilet
A step up from a portable toilet, a cassette toilet is a self-contained unit with a removable waste tank. It’s more permanent than a portable toilet but still compact and easy to use. It requires a bit more space and some installation work, as it needs to be connected to the plumbing system. - Full Wet Bath
For those who want all the amenities of home, a wet bath (a combined shower and toilet area) is the way to go. This setup requires more space and a more complex plumbing system but offers the convenience of a full bathroom. You’ll need to install a shower pan, hot water heater, waterproof the walls, and connect the fixtures to your water supply and grey water tank. - Cheap-O Wet Bath
If you are like me and want a hot water shower without installing a full shower system, then consider using a kettle to heat hot water and get a cheap USB-powered showerhead and a bucket. Works GREAT!
Installing the Bathroom Components
- Toilet Installation: If you’re using a cassette toilet or portable toilet, secure it in place and connect it to the necessary plumbing, if applicable.
- Shower Installation: For a wet bath, install the shower pan and waterproof the walls with fiberglass panels or a similar material. Connect the showerhead to your plumbing system, ensuring there’s adequate water pressure.
- Ventilation: Bathrooms in small spaces need good ventilation to prevent moisture buildup. Consider installing a roof vent, fans, and ventilation system to keep the area dry and fresh.
With the kitchen and bathroom installed, your box truck conversion is nearly complete. The final phase will involve adding storage spaces, decorating the interior, and making sure everything is securely in place for life on the road. These finishing touches will make your truck truly feel like home.
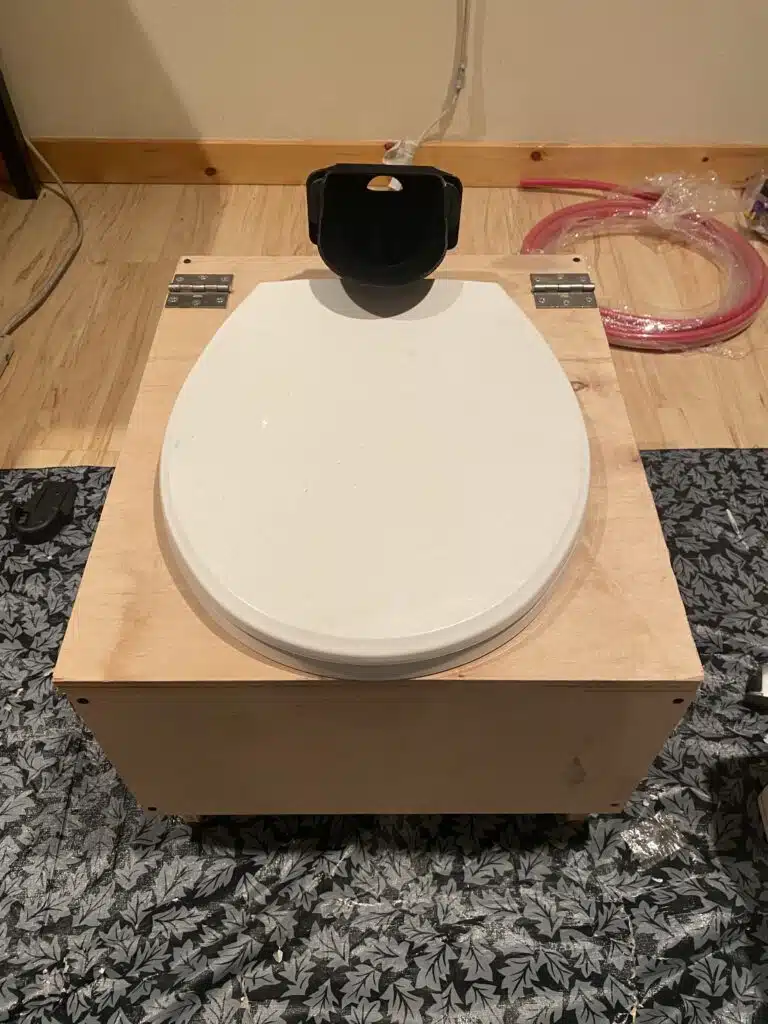
compostable toilet example
Enjoy your Box Truck RV Conversion!
Your box truck conversion is now complete, transformed from a simple cargo vehicle into a fully functional, personalized home on wheels.
You’ve created a space that’s uniquely yours, equipped with all the essentials for comfortable living on the road.
Whether you’re planning to travel full-time or just hit the road for weekend adventures, your box truck conversion is ready to take you wherever you want to go.
As you embark on your new mobile lifestyle, remember that living in a converted box truck is about more than just the physical space—it’s about the freedom to explore, the joy of simplicity, and the satisfaction of creating something with your own hands.
Safe travels and enjoy the journey!
0 Comments